Wednesday, February 12, 2025

The Birth of Aphrodite

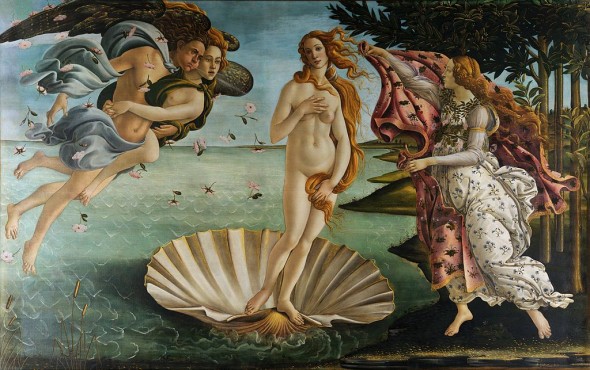
Botticelli Birth of Venus 450x230 Botticellis Birth of Venus
Birth of Venus, by Sandro Botticelli, c. 1484-86
Botticelli's Birth of Venus is my favorite painting from the Italian Renaissance. Venus, in all her naked glory, is depicted riding to shore on a scallop shell and sea foam, being blown by Zephyrus (who is carrying the nymph Chloris) to be greeted by Pomona, the goddess of Spring. Venus's beauty was so great that wherever she stepped flowers would bloom and sand would turn to grass. Impressive! Venus embodies love, beauty, sex, fertility and prosperity in Roman mythology. She is also known as Aphrodite, the Greek goddess of love, beauty, pleasure, and procreation. But do you know the story of her birth?

According to Hesiod's poem, Theogony, Gaia was the primal Greek Mother Goddess, creator of the Earth and all the Universe. Gaia created and married Uranus (primal Greek God of the sky) and had many children. Some of the children became the Titans, three were cyclopes, and three were monsters known as "hecatonchires" (which had 100 arms and 50 heads each), some became giants, and the youngest child, a Titan, was named Cronus. Uranus could not bear the sight of his hideous children, specifically the cyclopes and hecatonchires, and hid them away in the bowels of the earth. Well, Gaia wasn't too happy with this and set out for revenge. She created a flint sickle and with the help of Cronus set up a trap. As Uranus was coming to join Gaia, Cronos castrated him and threw his "stuff" into the sea. The sea began to bubble and foam "from the immortal flesh" and "with it a girl grew." Yes, it was Aphrodite, whose name means "risen from the foam." Wow and gross! That would make an interesting family tree!

Anyway, it was the birth of Aphrodite/Venus gliding on a scallop shell that has given scallops their aphrodisiac reputation. In fact, scallops are believed to raise sexual hormones in men and women, and have the ability to elevate moods! Check and check! This exquisite recipe, from Chef Eric Brenner, for "Seared Scallops, Saffron Risotto and Beurre Blanc" is the perfect Valentine meal! Luscious sweet scallops, served on a bed of creamy saffron risotto, and a generous drizzle of the best damn beurre blanc I've ever tasted is sexy, elegant, and extremely romantic! In addition, you will need to enlist the help of your mate to stir the risotto while you finish the rest! Cooking together is sexy! So, light the candles, pour some wine, and let the pleasure begin!   


Seared Scallops, Saffron Risotto and Beurre Blanc

Serves 4 (I have halved this recipe with great success, if you prefer dinner for two!)

Ingredients:
For the Beurre Blanc
1 lemon
1 bay leaf
1 shallot, minced
2 tablespoons plus 2 teaspoons white wine
2 tablespoons white vinegar
1/4 cup heavy cream
1/4 pound (8 tablespoons) butter, softened

For the Saffron Risotto
1 pinch saffron
2 quarts chicken stock
2 tablespoons butter, divided
1/4 cup minced shallots
2 cups Arborio rice
1/2 cup white wine
1/4 cup fresh peas
Kosher salt and pepper, to taste

For the Scallops
12 dry-packed sea scallops
Kosher salt
3 tablespoons olive oil

Directions:
Remove and discard the side muscle from the scallops. Set the scallops on a paper towel and allow to come to room temperature while you make the beurre blanc and risotto.

For the Beurre Blanc
Remove the zest from the lemon with a vegetable peeler and place in a small saucepan. Add the juice of the lemon. Place the bay leaf, shallot, wine and vinegar in the saucepan and reduce by half. Add the cream and reduce to less than 1/4 cup. Remove from the heat, strain into another small pan and gradually whisk in the softened butter. Don't let the sauce go over 130 degrees. Do no try to reheat or refrigerate the sauce. (Sounds tricky, but it's not. You can do it!)

For the Saffron Risotto
In a saucepan, combine the saffron and chicken stock and set over low heat until almost simmering. In a medium saucepot, melt 1 tablespoon butter. Add the shallots and saute until translucent. Add the rice and saute until lightly toasted, but not browned. Add the white wine and cook, stirring, until evaporated. Slowly incorporate the chicken stock a few ladles at a time, stirring constantly, until reduced and the rice is tender. (This can take anywhere from 25-40 minutes. Taste, taste, taste!) When tender, fold in the remaining tablespoon of butter with a rubber spatula. Fold in the peas and season to taste with salt and pepper. Serve right away.

For the Scallops
Just before you think your risotto is almost ready, lightly season one side of the scallops with the salt. Heat a heavy skillet until it is screaming hot. (I use my cast iron pan!) Add the 3 tablespoons olive oil. When the oil begins to "dance" (just before smoking), place the scallops in the pan salt-side down. Cook until the scallops begin to caramelize, just a couple minutes. Flip the scallops and immediately remove the pan from the heat. The heat of the pan will cook the scallops through in about 3 to 4 minutes. 

To Plate
Place a 1/2-3/4 cup risotto onto each serving plate. Top each with three scallops. Spoon the sauce around the perimeter of each plate.

Recipe slightly adapted from Chef Eric Brenner.

Saturday, February 8, 2025

"Excuse me while I powder my nose!"

"Excuse me while I powder my nose" is such a girly saying dating back to the 1930s, evoking images of speakeasies, jazz/swing, and "The Golden Age Of Hollywood." However, this was the time of "The Great Depression," when people were broke, and movies and radio were the most common past-times in an attempt to escape the grim realities of life. Well, I'm glad those days are over - I hope!  With that said, there is nothing depressing, or more girly, than these adorable "Powder Puffs" from Laura Calder of French Food at Home. They would be great with a civilized cup of tea, with coffee for a special breakfast, or just an indulgent anytime treat! Believe me, they taste as lovely as they look!


Powder Puffs

Makes about 12 cakes

Ingredients:

1/2 cup flour
1/2 cup cornstarch
3/4 teaspoon cream of tartar
1/2 teaspoon baking soda
3 eggs, separated
3/4 cup sugar
1/2 cup or more raspberry jam (or whatever jam you prefer)
3/4 cup whipping cream, whipped with vanilla and some powdered sugar
Powdered sugar, to dust tops

Directions:

Heat the oven to 425 degrees, and line a baking sheet with parchment paper or nonstick silicone mats (e.g., Silpat). Combine the flour, cornstarch, cream of tartar, and baking soda, set aside. Beat the egg whites to soft peaks and beat in the sugar a spoonful at a time to make a stiff meringue. Whisk in the yolks one at a time. Sift the dry ingredients over the meringue and gently fold them in with a spatula. (Do not stir!)


Drop the batter, using 2 spoons, into 2 tablespoon mounds, spaced well apart, on the baking sheet. (I do 6 at a time.) Bake until well risen, lightly golden, and cooked through, about 7 minutes. Cool on racks.


Spread the flat side of one cake with jam, top with some whipped cream, and then sandwich with another cake. Continue with the rest. Let them sit an hour or so to soften and meld before serving. (If you can wait! Although, if you refrigerate them overnight, they are DIVINE!) Dust with powdered sugar, if you like, then eat them right away!

This recipe is also printed in Laura Calder's, Dinner Chez Moi, but renamed "Jam Yo-yos."

Friday, January 31, 2025

Mon Petit Chou

"Mon petit chou" (pronounced maw puh-tee shoo) is a French term of endearment which literally translates to "my little cabbage." At first you may think, "Gee, thanks..." However, the term chou (or choux, if plural) has a double meaning routed in the pastry world, chou referring to "chou a la creme" or cream puff! Ah, that's way better than being called a cabbage! Anyway, this brings us to "pate a choux" or choux pastry. Choux pastry is loosely regarded as being created in France by Chef Panterelli in 1540, who came with Catherine de Medici of Florence in 1533, upon her marriage to the future King Henry II of France. Over the years, the original recipe evolved, as well as it's name, from "pate a Panterelli" to "pate a Popelini," to "pate a Popelin" (which were cakes made in the Middle Ages and shaped as woman's breasts! Scandaleux!), and finally to "pate a choux." So, what is it? Basically, choux pastry is a twice cooked dough with high moisture that creates steam when baked, thus puffing up to create a crisp outer shell and hollow interior that's perfect for filling!

If you have never made choux pastry, I am about to change your life forever! This magical dough, which contains only four common ingredients (water, butter, flour, and eggs), is shockingly easy to make and takes mere minutes! It is the basis for eclairs, profiteroles (little buns that look like tiny cabbages, hence the name), stacked with caramel for "croquembouche," shaped into a ring and filled with praline cream for "Paris-Brest," the basis for "St. Honore cake," and fried to make beignets and even churros. If that's not enough, because choux pastry doesn't contain sugar, you can easily fill them with savory ingredients as well, like chicken or seafood salad, ham or prociutto and cheese, scrambled eggs and herbs, steak and bearnaise, or even mix in a little cheese before baking and you've got "gougeres!" The combinations are endless, and it all starts with this one simple dough! This recipe for "Profiteroles" will delight any "mon petit chou" and are perfect for Valentine's Day! Just don't let them know how easy it was!


Profiteroles (Choux Pastry Buns with Pastry Cream and Chocolate Ganache)

Makes about 50, depending on the size. 
*For larger shells for steak, etc., drop by large spoonfuls and bake at 400 for about 45 minutes.

Ingredients:
For the Pate a Choux
1 cup water
1 stick (8 tablespoons) butter
1 cup flour (I add 1/2 teaspoon salt to the flour, but it is optional and not traditional.)
4 eggs

For the Pastry Cream
1 recipe Creme Patissiere (Which can be made days in advance! or if you're lazy, fill with ice cream.)

For the Chocolate Ganache Glaze (Can be made days in advance!)
4 ounces semi sweet chocolate chips
1/2 cup heavy cream
1 tablespoon light corn syrup

Directions:
For the Pate a Choux
In a medium saucepan, boil the water and the butter.


Bring to a simmer and stir in the flour, about 1/4 cup at a time, stirring vigorously with a wooden spoon.


The mixture will become a big ball. Remove from the heat and allow to cool to room temperature.


Preheat your oven to 375 degrees.

Transfer the blob to the bowl of a stand mixer, or large mixing bowl. Starting with the lowest setting, beat in the eggs, one at a time.


Don't add the next egg until the previous one has been incorporated. Beat until smooth and velvety.

Line a cookie sheet with parchment paper or a Silpat mat. 

Using a pastry bag or two spoons, pipe or drop approximately 1" balls onto the sheet.


Using your finger dipped into a little milk, pat down the tips from piping, if necessary.


Bake for 25-30 minutes, or until medium-golden brown and dry on the outside. (You need to keep an eye on them, and can check to make sure they are fully cooked by cutting one open.) When done, remove to a cooling rack and allow to cool completely.


(Some people recommend piercing each one with a skewer or toothpick to allow steam to escape.) Once cooled, they can be stored in an airtight container until ready to be filled.

For the Chocolate Ganache Glaze
Place the chocolate chips in a medium bowl. In a small saucepan heat the cream to a simmer. Remove from the heat and stir in the corn syrup. Pour over the chocolate chips and mix until smooth. The sauce can be made ahead, covered and refrigerated, and gently reheated before using.

Final Assembly (*Assemble only as many as you plan to eat that day. Any remaining ingredients can be stored separately for a second round of indulgence!)
Using a pastry bag with a round tip, poke the tip into the side of each cream puff and pipe in enough pastry cream to fill the hollow center.


If you don't own a pastry bag, you can make a partial horizontal cut with a knife and spoon in some pastry cream. Just remember to hold the cut together when dunking into the glaze.

Holding each cream puff securely with your fingers, dunk and twist the top of each one into the chocolate ganache glaze to coat and set aside until ready to be served.

Voila!


(Mon Petit Chou loves them!)

Saturday, January 18, 2025

A Food Grinder, A Burger Fail, and A Luscious Ragu alla Bolognese

After purchasing some ground beef from a reputable grocer, in which I discovered bits of bone and God knows what else, I pledged to grind my own meat from now on! So, last weekend I purchased the food grinder attachment for my Kitchen Aid mixer,


various cuts of beef per Thomas Keller's Ad Hoc at Home cookbook where he gives a detailed tutorial on meat grinding, and made his version of a hamburger.


Well, the meat grinder worked very well, but apparently I didn't get the perfect ratio of meat to fat (should be about 80/20% for a juicy burger), because my burgers turned out to be hockey pucks! ****! I'll keep working on it and fill you in when I figure it out perfectly.

After my burger fail, I still had about 1 pound of my freshly ground lean beef blend (sirloin, spare ribs, and chuck), so I decided to make "Ragu alla Bolognese." Bolognese is a rich thick meat sauce originating in or around the city of Bologna in northern Italy. Ingredients for this traditional sauce include ground beef, pork, and sometimes chicken livers, slowly simmered with the classic soffrito of carrots, onions, and celery. White or red wine is used to deglaze, then beef broth is added and some milk. The sauce sometimes contains tomatoes, which is hotly debated! When making a Bolognese, it is best to use a lean grind of meat and to let the sauce simmer and simmer and simmer for hours. In addition, it is always served with the regions specialty pasta of an egg-rich tagliatelle or lasagna, never durum-rich spaghetti which is from the south! Apparently it doesn't matter which Nona you ask, everyone says their version is traditional and the best! In fact, in the "Classic Pasta" Issue #110 of Saveur, they included six different recipes for this luscious meat sauce! Either way, set aside a lazy day and enjoy this hearty and lovingly made pasta dish with your friends and family! They'll love it and you'll never buy jarred or frozen again! In fact, make extra and freeze it yourself!


Ragu alla Bolognese

Serves 4 (as main course) or 6-8 (as first course)

Ingredients:
For the sauce
2 oz thick-cut pancetta, 1/4" dice (or 2 oz thin slices, diced)
2 small carrots, 1/4" dice
1 celery stalk, 1/4" dice
1 yellow onion, 1/4" dice
2 garlic cloves, minced
2 tablespoons unsalted butter
1/2 lb (250 g) ground (minced) beef
1/2 lb (250 g) ground (minced) pork (or use all beef, if preferred)
1/2 cup (4 fl oz/125 ml) red wine (I like Chianti in this recipe) (Serve the remainder with the pasta!)
1, 28 oz can whole peeled tomatoes, drained, seeded, and chopped (I prefer San Marzano, if available)
1-2 tablespoons tomato paste
2 cups low-sodium beef broth, plus extra, if needed (I like Better Than Bouillon Beef Base)
1 cup (8 fl oz/500 ml) whole milk
1 teaspoon Kosher salt
1/4 teaspoon freshly ground black pepper
1/4 teaspoon freshly grated nutmeg
2 fresh bay leaves

For serving
1 lb (500 g) fresh egg pasta (tagliatelle, fettuccine, or pappardelle)
1 cup reserved pasta water, if needed
Parmigiano-Reggiano cheese, freshly grated, for serving

Directions:
For the sauce
In a large, wide, heavy-bottomed nonreactive pan, melt the butter over medium-low heat. When melted and foam begins to subside, add the carrots, celery, onion, garlic, and pancetta and cook, stirring occasionally  until all the ingredients are very tender, about 30 minutes. They should be a rich golden brown and smell like caramel. (If they begin to brown too much, reduce the heat and add a spoonful of water to slow the cooking.)

Add the ground meat(s) to the pan and stir well. Raise the heat to medium and cook, stirring often to break up the meat lumps, until the meats are lightly browned, crumbly, and their juices have evaporated, about 10 minutes. (Don't let the meat get crisp or dark brown, or they won't absorb the other flavors in the sauce, affecting the desired creaminess of the finished dish.)

Deglaze with the wine, scraping any browned bits off the bottom of the pan. Cook until the wine evaporated, about 2 minutes. Stir in the tomatoes, breaking up with a wooden spoon, 1 tablespoon of the tomato paste, the broth, the milk, salt, pepper, nutmeg, and bay leaves. Heat until small bubbles begin to form on the surface, then reduce heat to very low and simmer, stirring occasionally, for about 1 hour. (If the sauce becomes too dry, adjust with extra stock.)

Taste after the first hour of cooking and add the additional tomato paste, if desired. Partially cover the pan and continue simmering, stirring occasionally, smashing the meat and vegetables with the back of a wooden spoon (helps make sauce creamier), adding more stock if it becomes too dry, for about 1-2 more hours. When ready, remove the bay leaves, taste and adjust the seasonings (salt, pepper, nutmeg), if needed. Skim off any grease on the surface. Cover and set aside.

Finishing the dish
Cook the pasta according to package directions. Reserve 1 cup pasta water. Add drained pasta to the sauce and toss well to coat, adding some of the pasta water if needed. Every strand should be evenly coated. Serve immediately, passing the cheese at the table, if desired.

Friday, January 3, 2025

The Magic Bean

In France, January 6 is "La Fete Des Rois," which translates to "Festival of Kings," also known as Twelfth Night and the Epiphany, when the biblical three kings came to pay homage to the newborn Jesus. It is celebrated by sharing a "Galette des Rois," or "Kings' Cake," with family and friends throughout the month of January. Just like the song The Twelve Days of Christmas! Galette de Rois is a delicious, flaky pastry made with buttery puff pastry and filled with frangipane (almond cream paste), and includes a hidden "la feve" (originally a dry bean, or "magic bean"), and is sold with a silver or gold paper crown to perch on top. The person who gets the feve in their slice is declared the King or Queen and is allowed wear the paper crown! It is also customary that the youngest child at the table go hide (e.g., under the table) where they can't see the cake. The oldest person then cuts the cake into slices, the child comes back and chooses who will get each slice, just to keep things fair!

Galette des Rois is also known as a Pithivier, named after the town Pithiviers in northern France, where it apparently was created. The distinction between the two is the feve or magic bean. This recipe from Laura Calder, who seldom lets me down, was surprisingly easy and turned out beautiful! Just remember to keep everything as cold as possible. My only comment is that I thought it could be a little sweeter, so next time I will try using store-bought almond paste (sold in cans) instead of the ground almonds. I used the traditional dry bean and I saved a paper crown from our Christmas Crackers. My kids loved their Galette des Rois  (they each ate two slices!), and my youngest got a kick out of hiding under the table, in addition to finding the magic bean and getting to wear the crown! It truly is a tradition worth trying!


Galette des Rois (Kings' Cake)

Serves 8

Ingredients:
For the tart
2 sheets puff pastry, about 1/4" thick, chilled
1 egg, lightly beaten for sealing the pastry
Sifted icing sugar, for dusting (or a few spoonfuls of apricot jam, heated until runny) (I used apricot jam!)

For the almond cream
1/3 cup/70 g butter, softened
1/2 cup/70 g icing sugar
1/2 cup/70 g ground almonds (or almond paste)
1 egg
1 tablespoon dark rum
1/2 teaspoon pure vanilla extract
1 magic bean

Directions:
For the almond cream
Cream together the butter and sugar until light and fluffy. Stir in the almonds, then the egg, rum, and vanilla extract. Beat smooth with a fork. Cover and chill until firm, for at least an hour.

For the tart
Lay an 8" round plate on one sheet of cold puff pastry and go around it with a knife.


Do the same for the top round, but then roll this one a little with a rolling pin to make it slightly larger than the bottom round. (I found 8 1/2 " to be about right!)


Lay the smaller round of chilled pastry on a baking sheet. (I lined mine with parchment paper and highly recommend it.) Spread the chilled cream over, leaving a good 1" margin all around the edge. Hide a bean somewhere in the cream. Brush the border with egg wash (one egg white mixed with a smidgen of water).


Lay on the top round of chilled pastry and lightly press the edges to seal. Score the edge all around with the blunt side of a knife to seal.


Make a cross in the center for steam to escape and draw spirals out to the edges for decoration.


Brush with egg wash all over the top, avoiding the edges, so that they'll puff up easily. Chill in the freezer until very firm, about 20 minutes.

Meanwhile, preheat the oven to 450 degrees/230 degrees C. Bake the cake until puffed up high and dark golden in color, about 30 minutes.

Sprinkle with a thin coating of icing sugar and blast under the broiler or melt with a blowtorch. You can also brush with melted apricot jam for a glaze.